 ATC Quarterly guru Ronna Mogelon and her charming boyfriend Richard were in Toronto for a birthday party this weekend, and I met them beforehand for lunch. Even though we’d never met face to face before, I had the weirdest feeling of déjà vu—like we’d known each other forever and were just catching up. It was so much fun—and gave me a much-needed break from dealing with all the computer problems I've been faced with recently.
Remember that poor bloated PC-er on the Mac commercial? Well, I feel his pain. Not all of it though—at least I don’t have to wear a suit, and I’ve never been patronized by a hip, young Metrosexual (at least that I know of).
Life was much simpler when I wasn’t using a computer. On the other hand, there’s an answer for everything on the Internet. I leaned on my keyboard—why I don’t know—and I lost all my file names. But all I had to do to fix this was to enter the problem in Goggle, and an answer came up. I just love that. And the Internet is how I’ve met great people like Ronna and keep up with everyone else close to my heart.
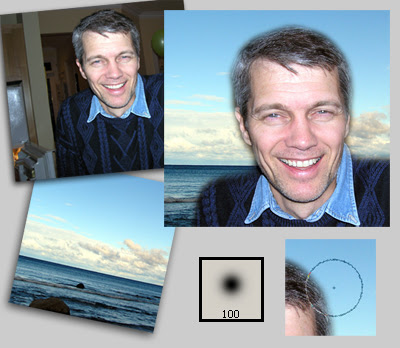 I really like this photo I took of my brother-in-law Brian, but the background was too dark so I decided to move him to a new environment.
Here’s how I did it:
(1) I opened the file I wanted to use as a background—the sky up at Meaford—and resaved it under a new name.
(2) Then I opened the photo of Brian, and using the Move tool (press “v” on your keyboard to activate it), I moved Brian over to the sky background.
(3) My next step was to choose the Eraser tool (press “e” on your keyboard to activate).
(4) Then I went to the Options bar and chose the Brush from the Eraser drop down menu, and a soft brush setting of 100 px—see above to get an idea of what it looks like. Note: Depending on the resolution you’re working at, you might need to choose a larger or smaller brush).
(5) If you’re following along with me, make sure that you have Full Size Brush Tip and Show Crosshair checked in the Edit>Preferences>Display and Cursors menu before you start using your brush.
(6) Now comes the tricky part. To erase the dark background, right click on your mouse and hold down taking short strokes. Check the picture above and you’ll see where I placed my brush as I was working around Brian. While it isn’t rocket science, it does take a little practice to get it right. I usually isolate the figure first like I did with Brian and then erase the rest of the background.
(7) When I finished, I used the move tool to place Brian where I wanted him on the background and then cropped.
To be honest, this technique usually works better on a darker background, but it was easier for me to show you how to do this on a lighter one. And when it comes to choosing an image of a person to work with, avoid someone with too much edge detail like flyaway hair or fingers.
 I’ve been scanning and restoring old family photos for John to send to his second cousin in Scotland. This one of John’s great grandfather was taken when he was best man at his sister’s wedding. Love the top hat, don’t you?
The interesting thing is that when you scan a photo that’s over 100 years old, you can see what the passage of time does to the emulsion. Even though he was only about twenty in this photograph, Great Granddad’s face was all wrinkled up like a prune completely obliterating his nose. So I gave him a new one and also removed the pencil thin eyebrows that the photographer had added with a tiny brush. Photo restoration is a painstaking business, but I really enjoy it because it’s so satisfying. When I finished, I decided to update Great Granddad to the 21st century by ATC-ing him with some layer effects and collage elements in Photoshop.
 Concentration is a problem for many of us when it comes to our art. We’re attracted to so many different techniques and projects that we often feel spread too thin. Where to start? What to do?
But Carin Brahm never seems to have that problem. Stamping is her starting point and nearly everything she does takes the medium father and pushes the envelope. She makes cards, artist’s books, framed art and much, much more. What Carin has achieved is amazing when you consider that she works full time and teaches too.
When I was interviewing her for the September/October 2007 issue of RubberStampMadness a few months ago, I was struck by Carin’s dedication and focus. It’s unwavering. And to think that 12 years ago she wasn’t doing any art at all!
The thing with Carin is that she found the medium that clicked with her and then responded to the call. What I learned from Carin is that when you find something that really resonates with you, jump right in and give it your all!
 A couple of weeks ago my friend Elizabeth Clontz posed the question: What is one teeny tiny thing in your creative workspace that if you shifted or remedied, it would make a big difference in your creative flow?
I have to admit thinking big and complicated is more my style. I’m sure my creative flow would be vastly improved by a $50,000 extension to my workroom—and the services of my niece Bridget (interior designer extraordinaire).
Still, Elizabeth’s question intrigued me so I thought I’d take a shot at answering it. Beside my computer desk, I have a table with dictionaries, my portfolios, clip art, books, journals, paper for my Epson, old photos and so on. Although it sounds chaotic, it’s really quite organized. But every time I want to print something or check my phone book, I have to move a set of upright files out of the way, and I haven’t used any of them in months.
Why hadn’t I done something about this before? Well, it seemed to be such an insignificant problem, and besides—I had nowhere to put the files (or so I thought). But in the space of ten minutes, I’d moved the files to a new location and now had more room and a more efficient workspace. Funny what one small change will do…how about you?
 David and his girlfriend came over yesterday for a visit and we had a great time. While Leigh and I hung around and got to know each other better – she’s studying art history at UCLA and is just lovely – David cooked a special dinner for us (although John informed me that he stirred the pasta a couple of times).
One of the advantages to having people over is that you have to put some effort into cleaning and tidying beforehand – that is if you don’t want your guests to think you’re a slob. Even though I know I’m housekeeping-challenged, I like to maintain the illusion that I’m not. So it was nice to wake up to a spic and span house this morning – one that I didn’t have to feel guilty about for a change. Because I was feeling pleased with myself, I decided to do nothing today except figure out how to make my own brushes in Photoshop and watch TV. I’ve always been confused about Labour Day though. Are you supposed to take the day off, or are you supposed to work? I have a feeling that I should play hooky more often, but there’s a part of me that keeps saying: What if you like it so much you never want to work again?
 I know I’m not the only person who gets that itchy feeling inside when September 1st rolls around. You want to buy yourself a fresh box of colored pencils and some pristine notebooks because it feels like the time for a brand new start.
But I never liked school much. I hated being warehoused, and always seemed to be in some kind of trouble for something – passing notes; talking, laughing and carrying on with my friends; skipping school; and just generally wondering why my own personal agenda never dovetailed with what authority figures had in store for me. Oh, and I was never teacher’s pet either.
The weird thing is that I still feel like a student – a student in The School of Life. The question is: will I ever graduate? (And how will I know if I have?)
 If you’re a type junkie like me, you welcome any Photoshop effect that enhances it – and as you can see from the Back to School samples shown above, adding a drop shadow gives the type more dimension.
Here’s how I did it:
(1) Open a new document 3” x 2” in size.
(2) Click on your Foreground Color in the Toolbox to bring up the Color Picker and choose yellow. (I was aiming for the school bus look).
(3) Go back to the Toolbox and click on the Paint Bucket to fill your white space with yellow.
(4) Now return to the Foreground Color in the Toolbox and change the color to black.
(5) Then it’s back to the Toolbox again, but this time you’ll click on the Type tool.
(6) In the Options bar above, choose Helvetica>Bold>48 pt type. (If you don’t have Helvetica, another bold sans serif type will do just as well).
(7) Position your cursor and type Back to School. Use the Move Tool to shift your finished type if you need to.
(8) Go to the Layers Palette and you will see that Back to School appears on its own layer. Double click in the space right beside it to bring up the Layer Style dialogue box.
(9) Under Blending Options, choose Drop Shadow. (10) Click beside Drop Shadow to bring up more options, and using the slider, lower the Opacity to 40 per cent. Then click OK and you’re done!
 A couple of years ago Carmi gave me a book called Joseph Cornell's Theater of the Mind: Selected Diaries, Letters, and Files. I have several other books on him, but this is the only one that focuses on his writing and I love it.
My favorite line of Cornell’s is: “…day/and I gathered fragments of blue dense.” For a while now I’ve been trying to think of a way to express these words visually, and I think this ATC is the closest I can come to it. Of course I just had to include the Medici princess (Bia) that Cornell features in one of his well-known assemblages.
 Do you remember Hackers? It’s the 1995 movie starring Angelina Jolie (and her lips were just as plump then as they are now). Anyway, there’s a scene where the hackers are trying to break into Fisher Stevens labyrinth of files—graphically represented as mile after mile of skyscrapers.
Tonight when I was doing a back up that’s exactly what my hard drive reminded me of. I have so many files it’s insane. Do I have the strength for a total cleanup of the megacity? Somehow I doubt it. Where is Batman when I need him?Fortunately I’m off tomorrow to spend three days in Orillia with Bruce and Diane, so I can postpone any action for now. It will be good to get away from everything digital. David gave me a nifty book of old anatomy illustrations, so I’m going to take that to look at, along with some art books and my journal.
 Saturday is my least favorite day of the week. I think this might be because I was stood up for a high school prom on a Saturday. I still remember spending that night reading Gone With The Wind in my nightgown and a beehive that had been carefully concocted at the hairdresser’s earlier. (My friends were all out partying of course).
Fortunately teenagers don’t worry about having a date for the prom now. They just go anyway, which I think is much healthier.
John took me to see Stardust this afternoon and we both enjoyed it. It’s a charming movie and I’m surprised that it only got a 73 per cent positive rating from the critics on Rotten Tomatoes. Then again, Existenz—a movie that reminds me of a bad case of stomach flu—got 71 per cent, so all things considered, you’re probably best to go with your gut…or is that an oxymoron?
When we got home, David called and I spent an hour chatting to him about art, life and more art. I usually play in Photoshop when I’m talking on the phone, but I was so engrossed in our conversation that I completely forgot about it.
Tonight I’ve been enjoying ATC Quarterly. Each issue is such a gem, and Ronna does a great job of putting it all together. I think what I love about ATC-Q is the incredible variety…different ages, different approaches, men and women, and lots of fab art. It’s always so fresh and inspiring. The cover (shown above) features a journaling ATC by Cindy Couling, and inside there’s an article on her. I keep thinking I’d like to do this myself. Now I’ve promised myself that I actually will.
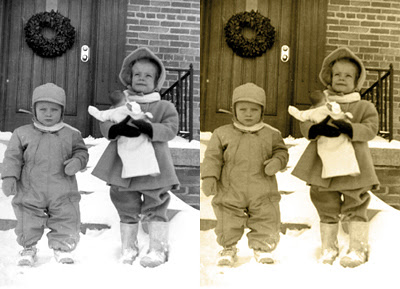 It’s easy to add a sepia tint if you want to give a black and white photo a vintage look. There’s more than one way to do it in Photoshop, so I’ll share one of them with you today.
1. Open your photo—I chose one of my brother Robin and me—and then go to Image>Adjustments>Levels, and Brightness and Contrast to perk up your image.
2. Next, click on the New Layer Icon at the bottom of the Layers Palette.
3. Now go to the Toolbox and click on your foreground color. This brings up the Color Picker dialogue box. Choose Color Libraries and then Pantone Solid Coated (usually the default). Type 133 and this will bring up a brown swatch. Click OK.
4. Then click on the Paint Bucket in the Toolbox to fill the new layer with color.
5. Go back to the Layers Palette and choose Color from the dropdown menu to make the layer translucent.
6. Adjust the opacity in the Layers Palette to get the effect you’re after. I lowered mine to 65 per cent here.
Note: You don’t have to go with brown of course. If you want to use a different color, you can make that choice in Step 3. Instead of entering 133, click on another color swatch.
 The problem with goal setting is that it’s seductive. You get so caught up in the possibilities that you set the practicalities aside.
I’ve been struggling with this since I started my book. Because of my freelance work, I’m geared to deadlines so I don’t usually procrastinate—and I haven’t been doing this with my book either. But what happens when you put in the time and yet you don’t make the progress you expected?My friend, creativity coach Beth Barany, suggested a couple of weeks ago that I just forget about having a deadline. I liked the idea of taking the pressure off, but I was skeptical. However, since I know from experience Beth has excellent instincts, I decided to give it a try. And do you what? I’ve got more done in the last couple of weeks than I have for ages. So thanks for the tip, Beth. (You rock!)
 Jeanne Schedler—my good pal and Photoshop buddy—has come up with her own version of a round robin: the digital volley. On July 19th, she lobbed the first volley via email (upper left); I responded by altering it and sending it back. We had five volleys each ending with me (picture lower right). Not only was the interaction a lot of fun, but also I learned something about myself: i.e. I don’t like tampering with anyone else’s art even when it’s done in Photoshop. It took me until Volley 10 to feel brave enough to transform Jeanne’s work. She, on the other hand, is much more adventurous than I am. But what else would you expect from someone who has walked on ice flows in the Antarctic?
 Normally when I’m working on a digital collage, I just cruise through my files choosing images that appeal to me, and then I see what happens when I put them together. I try not to over think this process, but occasionally I’ll work on a collage off and on for weeks.
For my slide project series (this is the second), I decided once again to concentrate on using collage elements from Christina’s digiWERX line …specifically a snippet of brocade scrapbooking paper, a button, an image from her daguerreotype sheet, the Polaroid slide mount of course and some writing from a ledger page. I noticed an entry for “Eureka Flour” and decided to call my girl Eureka Flo.I prefer to give the unknown people I transform a name. I don’t know whether this one really suits her, but I like the name enough to consider writing a story about her. Euereka Flo doesn’t look too happy in my opinion, but maybe she was just concentrating on keeping still for the photographer.
 I think my fascination with 19th century photographs stems from my relationship with my grandmother who loved everything Victorian and was always so good to me. I remember dropping a bottle of milk on the floor, and Nana saying: “Don’t worry Sue—it will be good for the wood.”
I used to love going to her apartment to stay overnight because she would make me chocolate cake and sew clothes for my Miss Canada doll. Nana also let me read her True Detective magazines, which she kept hidden under her bed. I loved those mags because they contained the kind of lurid details I just couldn’t get enough of.
When I was looking for something else today, I came across this tintype of my great-grandmother Wakelin—Nana’s mother—and one of her children. I’m not sure which one it is since she had thirteen of them, but I know it’s not my grandmother.Everyone in the Wakelin family had beautiful blue eyes and tight eyelids that made them look like Malamutes or hawks. I don’t mind having brown eyes, but I’ve always envied those eyelids. Oh well, maybe in my next lifetime.
 Even though Christina Lazar Schuler lives at least 2,700 miles from me, I still feel like I’m getting together with her when I visit her website and download some digiWERX treats to experiment with. They don’t cost much because you do your own printing. Or you can do what I do: import them into Photoshop and play.
I particularly like Christina’s ledger pages and Polaroid slide mounts that I used to frame this young miss in the amazing hat from one of her Carte de Visite collage sheets. Do I feel another series coming on? You know I do!
 Over the last year and a half, I’ve bought quite a few royalty free images from istock to alter for use in my book and various freelance projects. Istock prices are reasonable, and if you’re a member you also have access to the free image of the week and the dollar bin, which has lots of cool images to download.
I liked this cute istock image of two sisters walking down a road because it reminds me of the close relationship I have with my own sister Pam. Cropping and changing the color allowed me to zero in on the girls and to give the original more emphasis. Plus it’s easy to do.
1. I opened the istock image in Photoshop and then created a new file. (Always leave your original image intact in case you want to work with it again. I learned this the hard way!)
2. Next, I experimented with the Crop tool to give the photo more graphic interest.
3. After cropping, I right clicked on the Background layer in the Layers Palette and chose Duplicate Layer. Then I did this again, so I now had three layers with the same image: Background, Background Copy 2 and Background Copy 3. (Again, it’s always best to work with duplicate layers in case you want to revert to the image you started with).
4. For Background Copy 2—the middle layer—I went to Image>Adjustments>Invert to reverse the colors.
5. For Background Copy 3—the top layer—I chose Color from the drop down menu in the Layers Palette. As soon as I did this the colors on the middle layer jumped out (well, not literally) to make the photo more dramatic.Even though I’ve done a few gift albums in my time, I’m not really a scrapper. However, I think I’ll try this technique on the next album I do. It might work for a card too.
 Andrea gave me a great book for my birthday called Women, Art, and Society by Whitney Chadwick. If you’re intrigued by the role of women in art history like I am, you’ll love this book. It’s text-heavy but fascinating.For example, did you know that women artists had more freedom in the medieval period than they did in the Renaissance? If you were painting in Italy during the 16th century, any commissions you made went straight to your father or husband. Imagine being the court painter to Phillip II of Spain like Sofonisba Anguissola was, and yet you’re not allowed to have your own money or cash your own cheques. I’m just grateful I’m living in the 21st century myself.
 I’m finally beginning to understand Adobe GoLive. Sort of. I keep starting it, getting overwhelmed, then giving up. This time I seem to be sticking with it because I want to have a website.
What strikes me about these different programs, though, is they’re way too complicated. I had the same problem with Photoshop once upon a time. But since I’d done graphic art and layout for so many years, I could see the sense behind it and the program gradually became easier.
Still, anyone who struggles with Photoshop the way I’ve struggled with GoLive has my sympathies. It seems to me that if software designers can make something difficult or arcane, they go for it. Is this a move on their part to let us know that they are way smarter than we are? This reminds me of Conrad Black. He likes to sprinkle his conversation with words that force lesser mortals to head for a dictionary.

 ATC Quarterly guru Ronna Mogelon and her charming boyfriend Richard were in Toronto for a birthday party this weekend, and I met them beforehand for lunch. Even though we’d never met face to face before, I had the weirdest feeling of déjà vu—like we’d known each other forever and were just catching up. It was so much fun—and gave me a much-needed break from dealing with all the computer problems I've been faced with recently.


