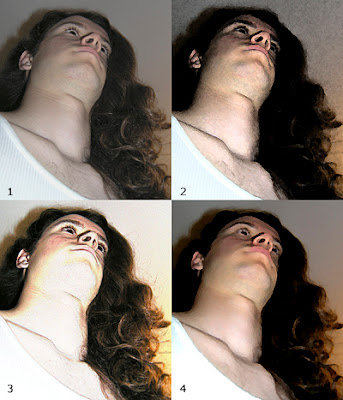
 Filters are a fun way to change an image almost instantaneously. Some are very dramatic, but I prefer a more subtle approach—particularly for portraits.
There are three things you should know about Filters before you begin to play with them:
First, go to the Layers palette and duplicate the image you want to alter. Then use this layer to work with. That way your original remains intact if you decide you don’t like the result.
Second, resolution is important. The lower the resolution, the more exaggerated the effect—not usually my preference—so I work at 300 ppi, and then reduce the image to 72 ppi if I plan to post it on the web.
Third, take time to play with the controls most filters offer you. Just using one filter can produce a wide range of different effects.
Now I’ll explain what how I experimented with this photo of David:
(1) I cropped the original to make it more graphic. You can see that David looks a little flat, so I went to Image>Adjustments>Auto Levels, and Hue/Saturation to give him more contrast and stronger color. I used this as the starting point for my three versions.
(2) To turn David into a rock star look, I headed (digitally speaking) to Filter>Artistic>Fresco and chose the least extreme effects: 1-1-1. It doesn’t get much easier than that.
(3) This version of David was achieved by choosing Filter>Stylize>Find Edges. You don’t have to make any decisions here—just click and you get what looks like a sketch. But because this looked too washed out to me, I went to the Layers palette and chose Overlay. This allowed the color on the original layer to show through.
(4) This is my favorite because it looks the most painterly. I went to Filter>Artistic>Palette Knife and chose 13-3-4 to get the effect I wanted. But it’s not a formula. Your own photos will likely require different numerical values from mine.
See you next week!

No comments:
Post a Comment