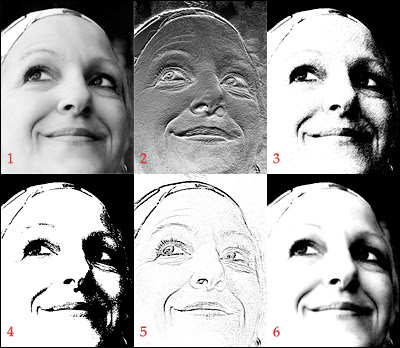
 A couple of weeks ago, I explained how to turn a color photo into a black and white graphic using the Threshold command. But there are several other ways you can get dramatic effects by working with the sketch filters in Photoshop.
(1) A high contrast image seems to work best, so I chose a black and white photo from istock for my sample. If you’re starting with something in color, though, go to Image>Adjustments and choose Desaturate.
(2) Most people ignore this carved in stone look, but why not give it a whirl? Select Filter>Sketch>Bas Relief and play with the sliders. (For mine, I chose Detail 13, Smoothness 3 and Light: Bottom).
(3) Terry turned me on to this pen and ink effect and I love it. Go to Filter>Sketch>Graphic Pen and experiment. (My settings were: Stroke Length 15, Light/Dark Balance 50 and Stroke Direction: right diagonal).
(4) If you’re a stamper, you just have to play with this effect and pretend you’re designing your own stamp. Select Filter>Sketch>Stamp and then go to town. (Here I used Light/Dark Balance 25—usually the best for this technique, and a Smoothness of 25).
(5) This is one way to turn an image into a line drawing in Photoshop, although it’s not always reliable. Chose Filter>Sketch>Photocopy and play around with the sliders. (I used Detail 9 and Darkness 8 for mine).
(6) The Conte Crayon filter (in the flyout Filter>Sketch menu) delivers a soft, dreamy effect when you take the time to experiment with the settings. Here I chose Foreground 11, Background 7, Texture: canvas, Scaling 100%, Relief 4 and Light: top—but trust me, it’s not as complicated as it seems).
Have fun with these filters, and I'll see you next week.

No comments:
Post a Comment