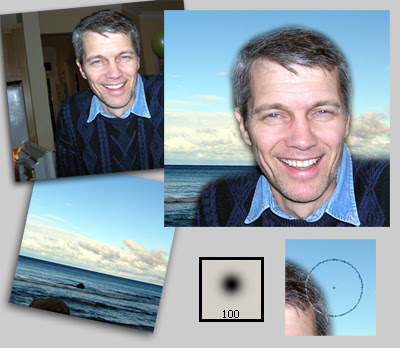
 I really like this photo I took of my brother-in-law Brian, but the background was too dark so I decided to move him to a new environment.
Here’s how I did it:
(1) I opened the file I wanted to use as a background—the sky up at Meaford—and resaved it under a new name.
(2) Then I opened the photo of Brian, and using the Move tool (press “v” on your keyboard to activate it), I moved Brian over to the sky background.
(3) My next step was to choose the Eraser tool (press “e” on your keyboard to activate).
(4) Then I went to the Options bar and chose the Brush from the Eraser drop down menu, and a soft brush setting of 100 px—see above to get an idea of what it looks like. Note: Depending on the resolution you’re working at, you might need to choose a larger or smaller brush).
(5) If you’re following along with me, make sure that you have Full Size Brush Tip and Show Crosshair checked in the Edit>Preferences>Display and Cursors menu before you start using your brush.
(6) Now comes the tricky part. To erase the dark background, right click on your mouse and hold down taking short strokes. Check the picture above and you’ll see where I placed my brush as I was working around Brian. While it isn’t rocket science, it does take a little practice to get it right. I usually isolate the figure first like I did with Brian and then erase the rest of the background.
(7) When I finished, I used the move tool to place Brian where I wanted him on the background and then cropped.
To be honest, this technique usually works better on a darker background, but it was easier for me to show you how to do this on a lighter one. And when it comes to choosing an image of a person to work with, avoid someone with too much edge detail like flyaway hair or fingers.

1 comment:
Looking great! Thanks for the tutorial.
Post a Comment